Introduction to AWS VPC with Terraform

Introduction
Terraform is an Infrastructure as a Code product from Hashicorp. In this article, we are going to use Terraform to create a complete VPC with Public Subnet, Internet Gateway, Route Table, and spread across all our defined Availability Zones on AWS. With Terraform, you can easily create the whole new infrastructure by only creating variables, and destroy it with just a single command. This article is using Terraform version v0.12.25. If you are only looking for the complete code, it is available here.
Prerequisites
- Terraform is installed
- AWS Account is connected and having proper permission
Amazon VPC
Amazon VPC is a logically isolated virtual network that is dedicated to an AWS account. This virtual network closely resembles a traditional network that you’d operate in your own data center, with the benefits of using the scalable infrastructure of AWS.
VPC Components
- VPC
- Subnet
- Routing Table
- Internet Gateway
VPC Hello world
Create main.tf.
provider "aws" {
  region = "ap-southeast-1"
}
resource "aws_vpc" "this" {
  cidr_block           = "10.0.0.0/16"
  enable_dns_hostnames = true
  enable_dns_support   = true
  tags = {
    Name = "akudev-vpc"
  }
}
❗ What is CIDR block?
Classless Inter-Domain Routing (CIDR /ˈsaɪdər, ˈsɪ-/) is a method for allocating IP addresses and for IP routing. Go to http://jodies.de/ipcalc to calculate the numbers of IP available by a CIDR block.
Let’s run our scripts by executing the commands below.
terraform init
terraform plan
terraform apply
After execution is done, let’s see the resources.
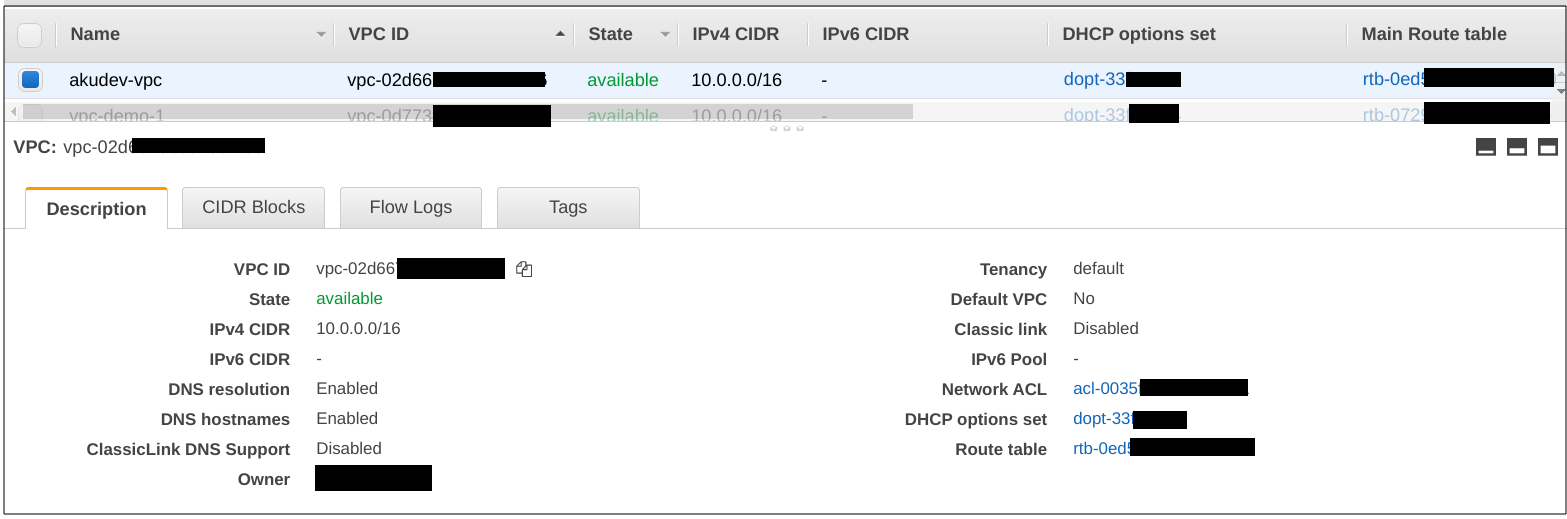
Great. Now let’s refactor our code by introducing the variables. 🚧
Variables
As per the official documentation, input variables serve as parameters for a Terraform module, allowing aspects of the module to be customized without altering the module’s own source code, and allowing modules to be shared between different configurations.
Update main.tf.
resource "aws_vpc" "this" {
  cidr_block           = var.cidr_block
  enable_dns_hostnames = true
  enable_dns_support   = true
  tags = {
    Name = "${var.project}-vpc"
  }
}
Create providers.tf file.
provider "aws" {
  region = var.region
}
Create variables.tf file.
variable "project" {
  description = "Project Name"
  type        = string
}
variable "region" {
  description = "AWS Region"
  type        = string
}
variable "cidr_block" {
  description = "The CIDR block for the VPC"
  type        = string
}
Create dev.tfvars file. This file is where we define all variables value.
project    = "akudev"
region     = "ap-southeast-1"
cidr_block = "10.0.0.0/16"
The file structure should now look like below.
.
├── dev.tfvars
├── main.tf
├── providers.tf
└── variables.tf
Now execute our Terraform infrastructure with these commands.
terraform plan -var-file=dev.tfvars
terraform apply -var-file=dev.tfvars
No changes in our infrastructure are expected as we are only refactoring it to use variables.
❗ One of Terraform’s powerful features is the state management. Terraform stores state in a specific file that it generates automatically. Let’s inspect the
terraform.tfstatefile and see what’s inside.
Subnets
A subnet is a range of IP addresses in your VPC. We can launch AWS resources into a specified subnet. In this case we create the public subnet that can be accessed by the internet.
Update main.tf, add subnet resource.
resource "aws_subnet" "public" {
  count = length(var.public_subnets)

  vpc_id                  = aws_vpc.this.id
  cidr_block              = element(concat(var.public_subnets, [""]), count.index)
  availability_zone       = element(concat(var.azs, [""]), count.index)
  map_public_ip_on_launch = true
  tags = {
    Name = "${var.project}-public-${count.index}"
  }
}
Update variables.tf file. Add the block below.
variable "public_subnets" {
  description = "List of public subnets for the VPC"
  type        = list(string)
}
variable "azs" {
  description = "List of availability zones names in the region"
  type        = list(string)
}
Update dev.tfvars file. Add the block below.
public_subnets = ["10.0.32.0/20", "10.0.96.0/20", "10.0.160.0/20"]
azs            = ["ap-southeast-1a", "ap-southeast-1b", "ap-southeast-1c"]
❗ Learn more about Terraform syntax & function: count, element, concat.
Now let’s deploy our infrastructure with these commands.
terraform plan -var-file=dev.tfvars
terraform apply -var-file=dev.tfvars
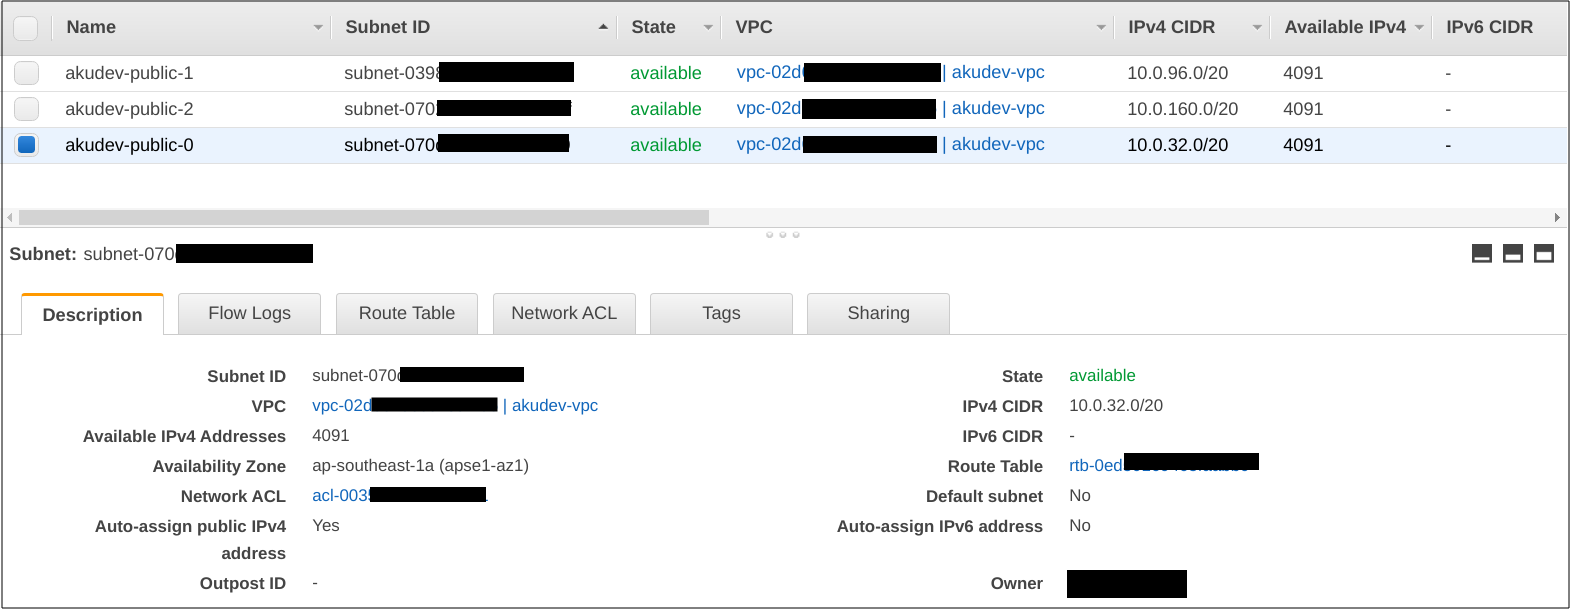
After the execution is complete, let’s inspect the resources created.
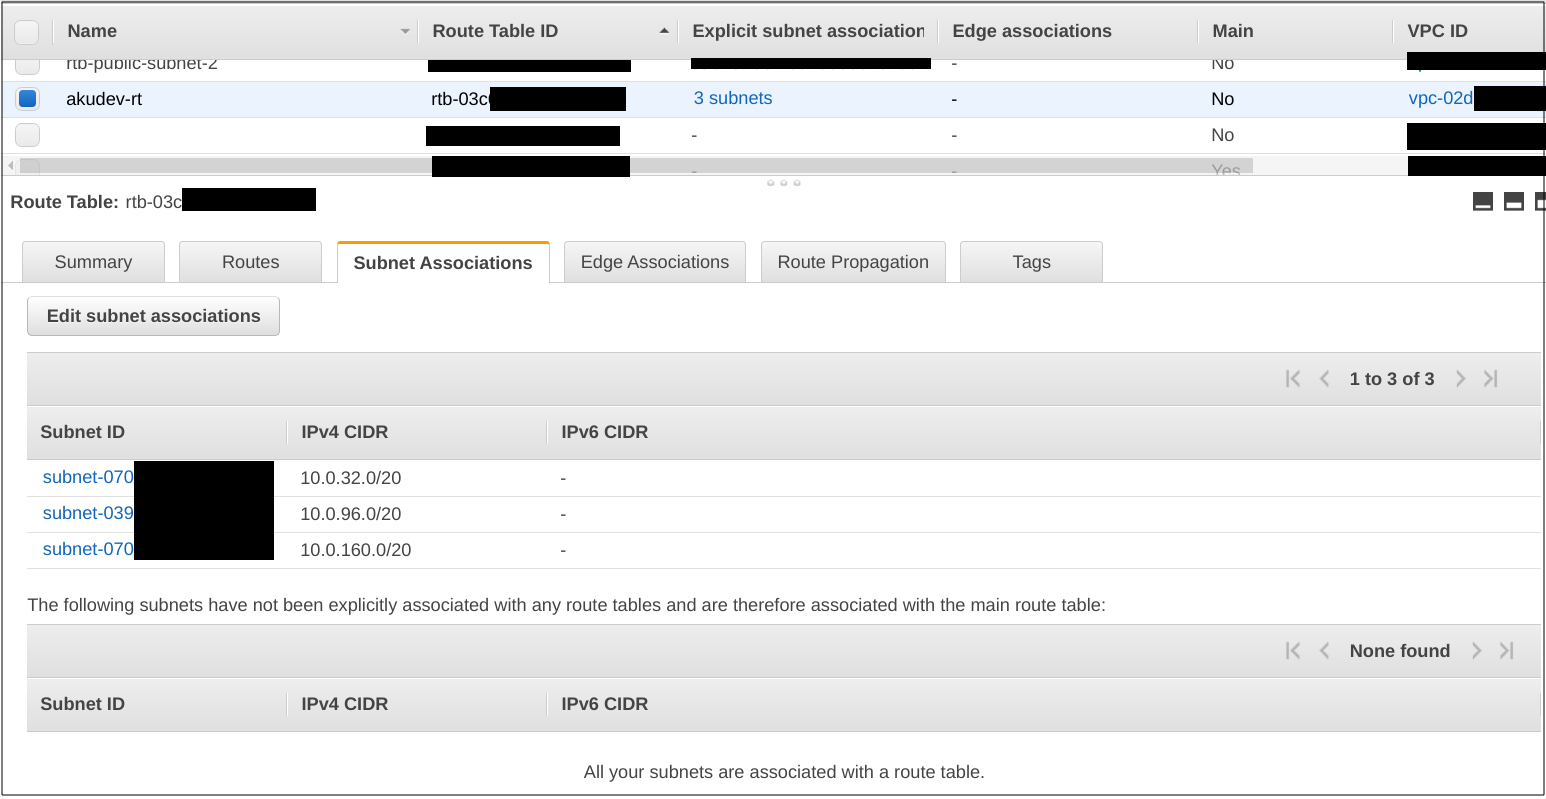
Route Table and Internet Gateway
As per the official documentation, a route table contains a set of rules, called routes, that are used to determine where network traffic from your subnet or gateway is directed.
An internet gateway is a horizontally scaled, redundant, and highly available VPC component that allows communication between your VPC and the internet.
Update main.tf. Add a new resource.
resource "aws_route_table" "public" {
  vpc_id = aws_vpc.this.id

  tags = {
    Name = "${var.project}-rt"
  }
}
resource "aws_route" "public_igw_route" {
  route_table_id         = aws_route_table.public.id
  destination_cidr_block = "0.0.0.0/0"
  gateway_id             = aws_internet_gateway.this.id

  timeouts {
    create = "5m"
  }
}
resource "aws_route_table_association" "public" {
  count = length(var.public_subnets)

  subnet_id      = element(aws_subnet.public.*.id, count.index)
  route_table_id = aws_route_table.public.id
}
resource "aws_internet_gateway" "this" {
  vpc_id = aws_vpc.this.id

  tags = {
    Name = "${var.project}-igw"
  }
}
Now execute our Terraform infrastructure with these commands.
terraform plan -var-file=dev.tfvars
terraform apply -var-file=dev.tfvars
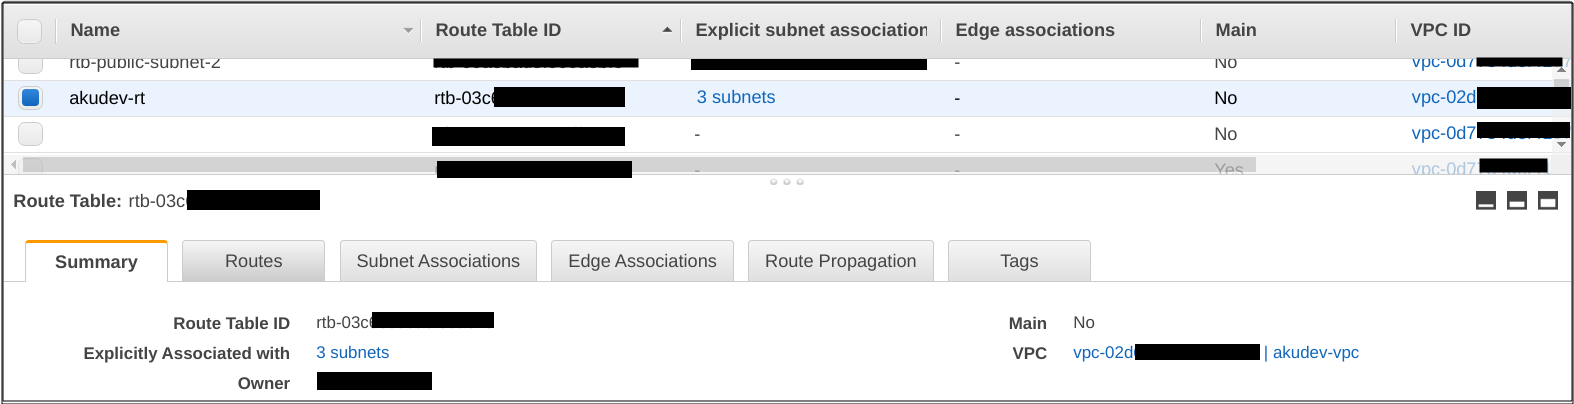
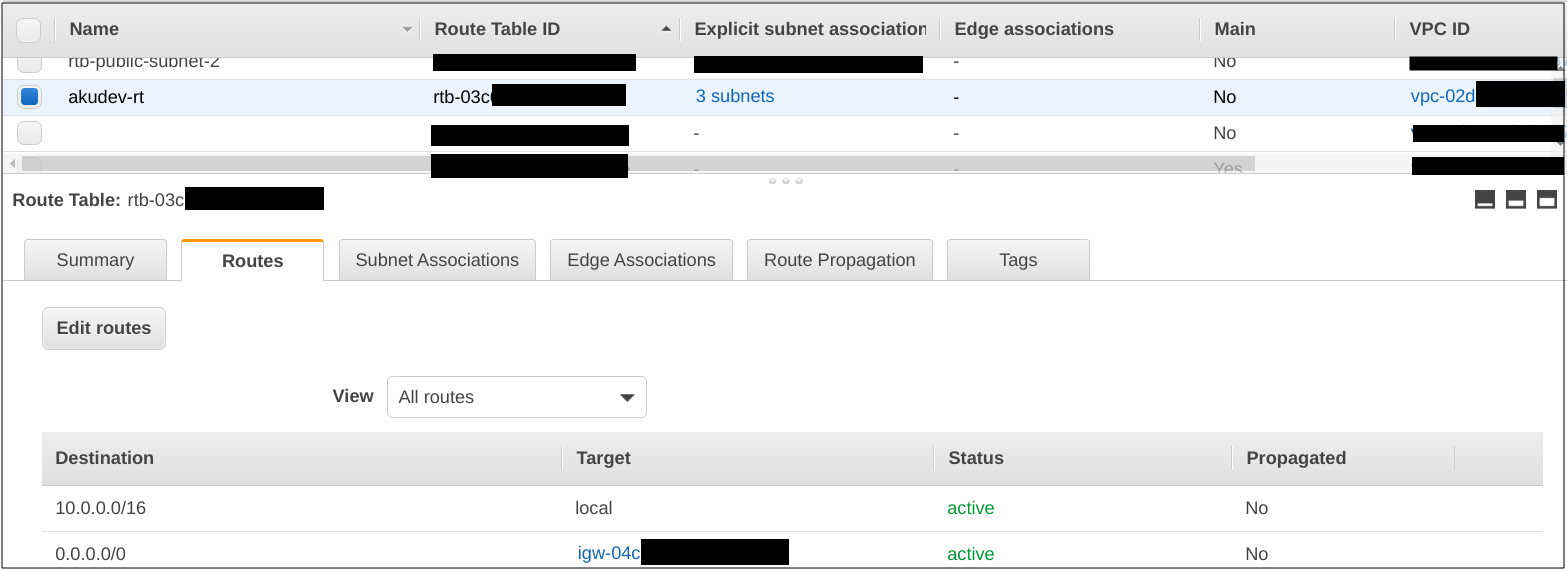
After execution is done, let’s see the resources.

Output
Output values are like the return values of a Terraform module, and have several uses:
- A child module can use outputs to expose a subset of its resource attributes to a parent module.
- A root module can use outputs to print certain values in the CLI output after running terraform apply.
- When using remote state, root module outputs can be accessed by other configurations via a terraform_remote_state data source.
Create outputs.tf.
output "vpc_id" {
  description = "VPC ID"
  value       = aws_vpc.this.id
}

output "public_subnet_0" {
  description = "Public Subnet 0"
  value       = aws_subnet.public[0].id
}

output "public_subnet_1" {
  description = "Public Subnet 1"
  value       = aws_subnet.public[1].id
}

output "public_subnet_2" {
  description = "Public Subnet 2"
  value       = aws_subnet.public[2].id
}
Now let’s execute the command.
terraform apply -var-file=dev.tfvars
And examine the output
....
Apply complete! Resources: 0 added, 0 changed, 0 destroyed.

Outputs:

public_subnet_0 = subnet-070d08c9539dd0fa9
public_subnet_1 = subnet-0398c19c758693d39
public_subnet_2 = subnet-07020dead4947732f
vpc_id = vpc-02d66796c64e9f486
We will use the information above to create a new EC2 instance.
Default public security group
As per the official documentation, a security group acts as a virtual firewall for your instance to control inbound and outbound traffic. When you launch an instance in a VPC, you can assign up to five security groups to the instance. Security groups act at the instance level, not at the subnet level.
Update main.tf. Add a new resource.
resource "aws_security_group" "default_public" {
  name        = "${var.project}_default_public_sg"
  description = "${var.project} default public SG"
  vpc_id      = aws_vpc.this.id

  ingress {
    from_port   = 22
    to_port     = 22
    protocol    = "tcp"
    cidr_blocks = var.vpn_cidr_block
    description = "VPN IP"
  }

  ingress {
    from_port   = 80
    to_port     = 80
    protocol    = "tcp"
    cidr_blocks = ["0.0.0.0/0"]
    description = "Allow http access"
  }

  egress {
    from_port   = 0
    to_port     = 0
    protocol    = "-1"
    cidr_blocks = ["0.0.0.0/0"]
  }

  tags = {
    Name = "${var.project}_public_sg"
  }
}
Update variables.tf file. Add the block below.
variable "vpn_cidr_block" {
  description = "CIDR block to access public instance"
  type        = list(string)
}
If you have a VPN, it is great. Just add /32 to the end of your VPN IP address. But if you don’t have one, you can grant TEMPORARY access to your public internet. Remember, TEMPORARY.
curl ifconfig.me
203.81.204.171
Update dev.tfvars file. Add the block below.
vpn_cidr_block = ["203.81.204.171/32"]
Update outputs.tf. Add the block below.
output "public_subnet_sg" {
  description = "Public Subnet Security Group"
  value       = aws_security_group.default_public.id
}
Now re-execute our Terraform commands.
terraform plan -var-file=dev.tfvars
terraform apply -var-file=dev.tfvars
You now have the ability to create and destroy infrastructure as needed easily, thanks to the powerful IAAC capabilities provided by Terraform. To destroy your infrastructure, simply execute the command below.
terraform destroy -var-file=dev.tfvars
❗ You can also add
-auto-approvewhen executingterraform applyorterraform destroyto skip the validation.
Example output
Apply complete! Resources: 11 added, 0 changed, 0 destroyed.

Outputs:

public_subnet_0 = subnet-070d08c9539dd0fa9
public_subnet_1 = subnet-0398c19c758693d39
public_subnet_2 = subnet-07020dead4947732f
public_subnet_sg = sg-0788cc2823796c618
vpc_id = vpc-02d66796c64e9f486
Test create instance
Now we have everything in place, let’s create a single ec2 instance to test our infrastructure.
Create ec2.tf.
resource "aws_instance" "this" {
  ami                         = "ami-07ce5f60a39f1790e"
  instance_type               = "t2.micro"
  key_name                    = "fajri_akudev"
  associate_public_ip_address = true
  security_groups             = ["sg-0788cc2823796c618"]
  subnet_id                   = "subnet-070d08c9539dd0fa9"
  tags = {
    Name        = var.project
    Description = "Managed by terraform"
  }
}

output "public_dns" {
  value = aws_instance.this.public_dns
}
❗ Make sure you have the key_name in place, in this case I already had one.
Now execute our Terraform infrastructure with these commands.
terraform plan -var-file=dev.tfvars
terraform apply -var-file=dev.tfvars
Example output
.....
Apply complete! Resources: 1 added, 0 changed, 0 destroyed.

Outputs:

public_dns = ec2-18-136-209-92.ap-southeast-1.compute.amazonaws.com
public_subnet_0 = subnet-070d08c9539dd0fa9
public_subnet_1 = subnet-0398c19c758693d39
public_subnet_2 = subnet-07020dead4947732f
public_subnet_sg = sg-0788cc2823796c618
vpc_id = vpc-02d66796c64e9f486
After execution is complete, let’s look at the resources created.
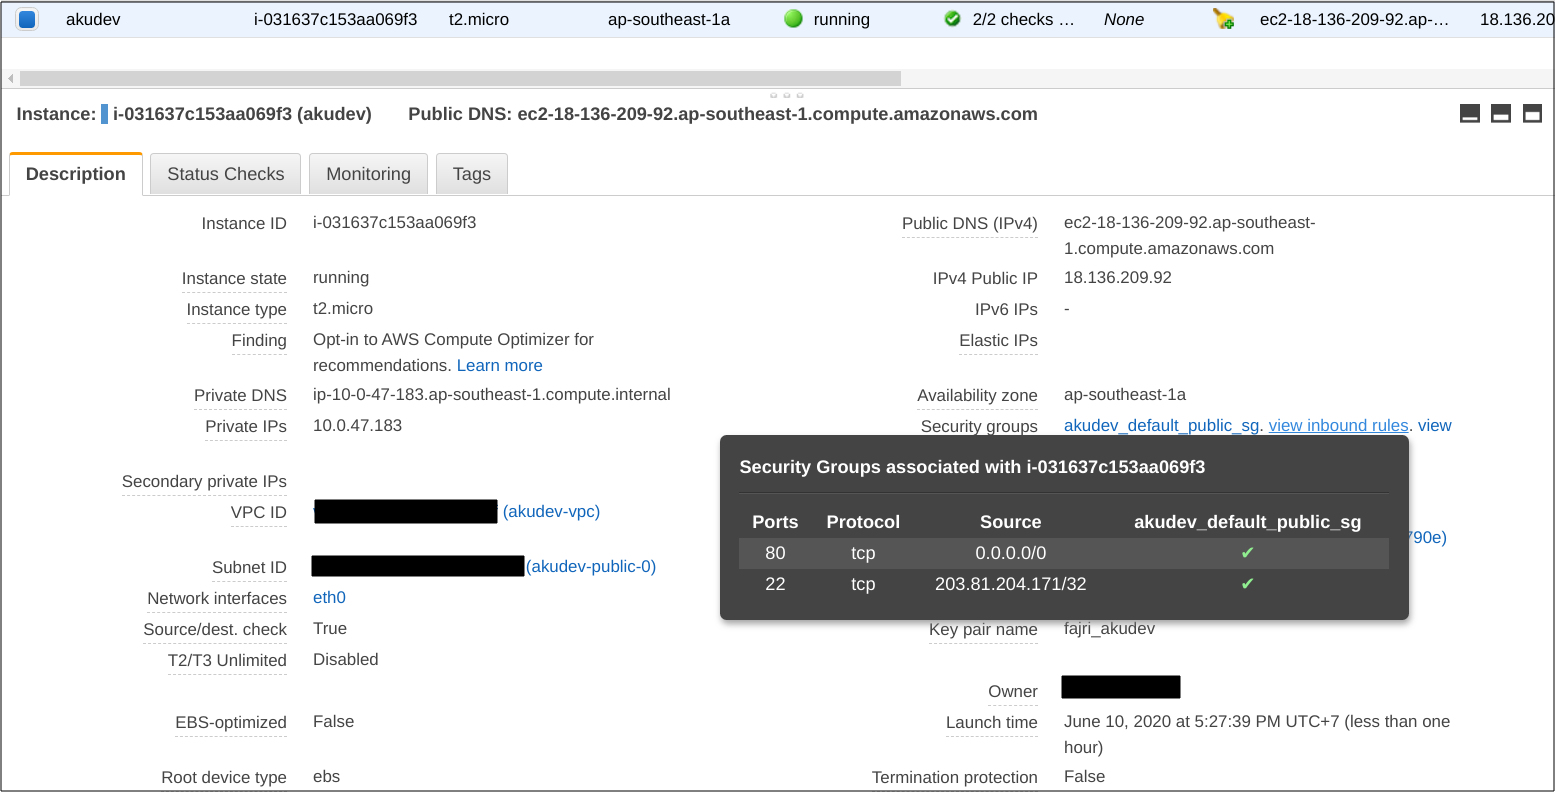
Test ssh to the instance
mv ~/Downloads/fajri_akudev.pem ~/.ssh
cd ~/.ssh
chmod 0400 fajri_akudev.pem
ssh -i "fajri_akudev.pem" ubuntu@ec2-18-136-209-92.ap-southeast-1.compute.amazonaws.com
❗ Now everything has been successfully deployed, but how do we now remove the ec2 instance. A simple way to do this is to simply comment out the
ec2.tfcode, and executeterraform applycommand again. The ec2 should be destroyed.
Add environment and workspace
Now we want to create a new environment for our infrastructure, but we have not defined anything on env or environment, except for a dev.tfvars file. We will also need to look into managing our state in terraform.tfstate file, otherwise, there would be a conflict.
Update main.tf. Add -${var.env} suffix to our resources.
resource "aws_vpc" "this" {
  cidr_block           = var.cidr_block
  enable_dns_hostnames = true
  enable_dns_support   = true
  tags = {
    Name = "${var.project}-vpc-${var.env}"
  }
}

resource "aws_subnet" "public" {
  count = length(var.public_subnets)

  vpc_id                  = aws_vpc.this.id
  cidr_block              = element(concat(var.public_subnets, [""]), count.index)
  availability_zone       = element(concat(var.azs, [""]), count.index)
  map_public_ip_on_launch = true
  tags = {
    Name = "${var.project}-public-${count.index}-${var.env}"
  }
}

resource "aws_route_table" "public" {
  vpc_id = aws_vpc.this.id

  tags = {
    Name = "${var.project}-rt-${var.env}"
  }
}
resource "aws_route" "public_igw_route" {
  route_table_id         = aws_route_table.public.id
  destination_cidr_block = "0.0.0.0/0"
  gateway_id             = aws_internet_gateway.this.id

  timeouts {
    create = "5m"
  }
}
resource "aws_route_table_association" "public" {
  count = length(var.public_subnets)

  subnet_id      = element(aws_subnet.public.*.id, count.index)
  route_table_id = aws_route_table.public.id
}
resource "aws_internet_gateway" "this" {
  vpc_id = aws_vpc.this.id

  tags = {
    Name = "${var.project}-igw-${var.env}"
  }
}

resource "aws_security_group" "default_public" {
  name        = "${var.project}_default_public_sg-${var.env}"
  description = "${var.project} default public SG"
  vpc_id      = aws_vpc.this.id

  ingress {
    from_port   = 22
    to_port     = 22
    protocol    = "tcp"
    cidr_blocks = var.vpn_cidr_block
    description = "VPN IP"
  }

  ingress {
    from_port   = 80
    to_port     = 80
    protocol    = "tcp"
    cidr_blocks = ["0.0.0.0/0"]
    description = "Allow http access"
  }

  egress {
    from_port   = 0
    to_port     = 0
    protocol    = "-1"
    cidr_blocks = ["0.0.0.0/0"]
  }

  tags = {
    Name = "${var.project}_public_sg-${var.env}"
  }
}
Update variables.tf. Add the block below.
variable "env" {
  description = "Environment Name"
  type        = string
}
Update dev.tfvars. Add the block below.
env = "dev"
As before, let’s execute these commands once more and validate the output.
terraform plan -var-file=dev.tfvars
terraform apply -var-file=dev.tfvars
Following output should be expected.
Now all infrastructure provisioned by our script carries a suffix, but we need a way to manage the state. We will introduce the use of workspace. Destroy the infrastructure, delete terraform.tfstate and terraform.tfstate.backup file, as we no longer need them.
terraform destroy -var-file=dev.tfvars
rm -rf terraform.tfstate
rm -rf terraform.tfstate.backup
Update main.tf add this block below at the top of the file.
terraform {
  backend "local" {
    path          = "terraform.tfstate"
    workspace_dir = "workspace"
  }
}
And execute these commands
terraform init
terraform workspace new dev
Now this is our directory structure
.
├── dev.tfvars
├── ec2.tf
├── main.tf
├── outputs.tf
├── providers.tf
├── variables.tf
└── workspace
    └── dev
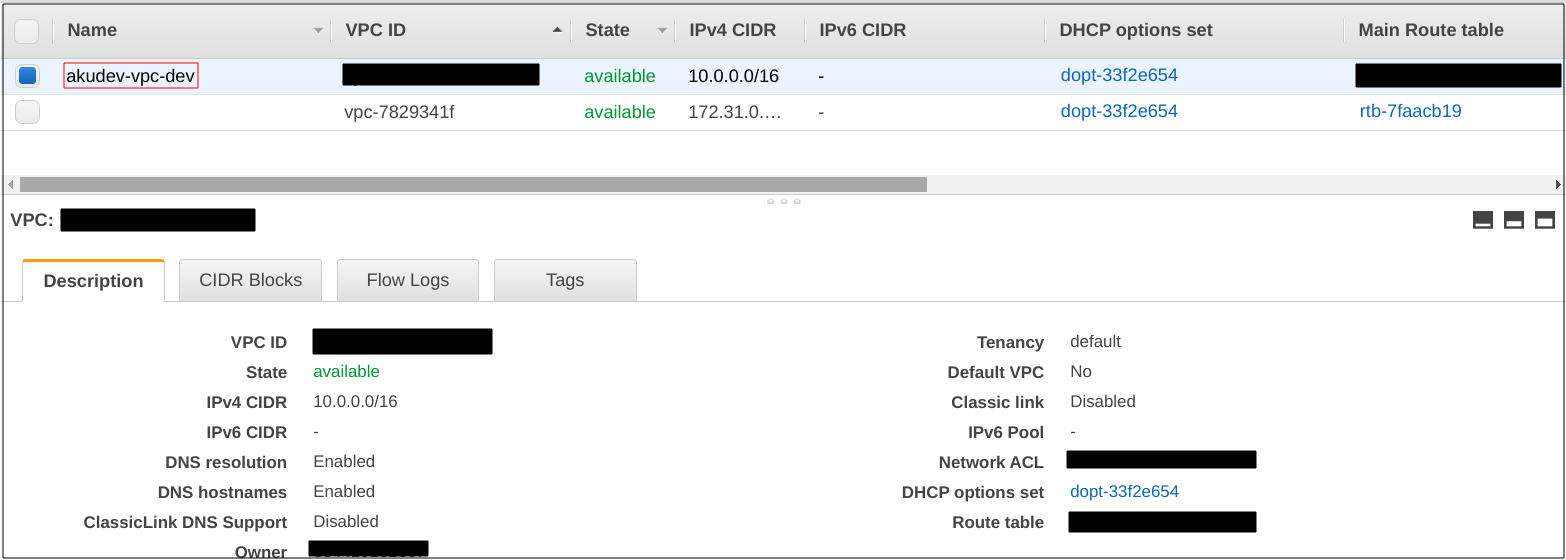
Recreate dev environment
Great, now we have successfully implemented the environment and workspace, but it still not very organized. Let’s create a directory called vars and move dev.tfvars to that directory.
mkdir vars
mv dev.tfvars vars
Now this is our directory structure
.
├── ec2.tf
├── main.tf
├── outputs.tf
├── prod.tfvars
├── providers.tf
├── variables.tf
├── vars
│   └── dev.tfvars
└── workspace
    └── dev
And apply these changes
terraform plan -var-file=vars/dev.tfvars
terraform apply -var-file=vars/dev.tfvars -auto-approve
As you can guess, there are no changes to be expected in the infrastructure as we have only moved the variable file into its own directory
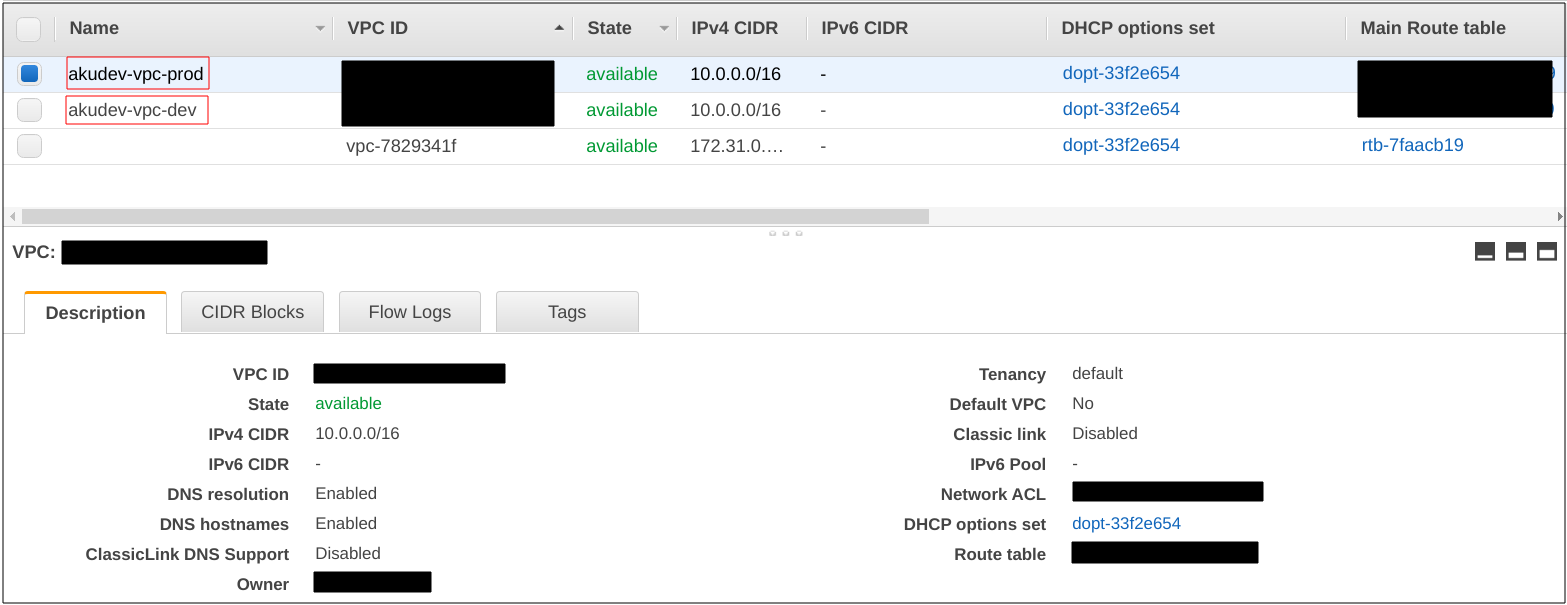
Create prod environment
Now we have our dev environment working fine, we can create prod environment.
Create vars/prod.tfvars.
project        = "akudev"
env            = "prod"
region         = "ap-southeast-1"
cidr_block     = "10.0.0.0/16"
public_subnets = ["10.0.32.0/20", "10.0.96.0/20", "10.0.160.0/20"]
azs            = ["ap-southeast-1a", "ap-southeast-1b", "ap-southeast-1c"]
vpn_cidr_block = ["203.81.204.171/32"]
And execute these commands
terraform workspace new prod
terraform workspace select prod
terraform plan -var-file=vars/prod.tfvars
terraform apply -var-file=vars/prod.tfvars -auto-approve
Let’s examine the resources created once execution is complete.
And here is our final file and directory structure.
.
├── ec2.tf
├── main.tf
├── outputs.tf
├── providers.tf
├── variables.tf
├── vars
│   ├── dev.tfvars
│   └── prod.tfvars
└── workspace
    ├── dev
    │   └── terraform.tfstate
    └── prod
        └── terraform.tfstate

4 directories, 10 files
To go back to dev environment, use the following commands.
terraform workspace select dev
terraform plan -var-file=vars/dev.tfvars
Conclusion
In this article, we have explored how we can create a complete VPC with Terraform. Creating IT infrastructure manually is prone to human errors such as a typo or missing a step which is very likely to happen. By describing and managing our infrastructure as code, they can be better managed and also be reviewed by others, along with other best practices that exist in the software development lifecycle.
But when working as a team, the state needs to be stored somewhere in a common location so that everyone can access it, for example, s3 is supported for that. I will dive deep in this specific area in my next article so stay tuned!
We also explored how to use Terraform Workspace. With this feature, we can easily create another environment simply by duplicating an existing file and changing the values accordingly. So when someone in the team asked for a new environment, the process would only require minutes. Also when the environment is done, we can easily destroy it with a single command.
The journey is still very long, but trust me, Terraform is fun 🔥