Create AWS EC2 Instance with Terraform

Terraform is an infrastructure as a Code (IaaC) tool that helps you build your infrastructure using script (code). You don’t have to interact with the web console nor through the CLI commands provided by your cloud provider. You may define your infrastructures by following the structure provided by Terraform then manage them directly your workstation.
In this article, I will demonstrate how to create an EC2 instance on Amazon Web Service (AWS) using Terraform.
1. Your AWS Credentials
Firstly, Terraform requires access and permissions to be able to provision resources on your AWS account on your behalf. Therefore, we will create an access key for Terraform on AWS IAM user by following these steps:
- Under AWS IAM on your AWS console, choose your user name from the list
- Click on “Security Credentials” tab
- Click on “Create access key” button to generate a new access key. A CSV file containing your credentials will be generated
- Download and open the CSV file on your computer to extract the Access Key ID and Secret Access Key
- Run the following command on your terminal / shell:
export AWS_ACCESS_KEY_ID="<access_key_id from aws administrator>"
export AWS_SECRET_ACCESS_KEY="<secret_access_key from aws administrator>"
2. Installing Terraform
Depending on your operating system, you may choose one of the following methods to install Terraform on your computer:
Ubuntu >= 18.04:
$ sudo snap install terraform
Ubuntu < 18.04:
$ sudo apt-get install terraform
OSX with Homebrew:
$ brew install terraform
For Microsoft Windows users, you may use the Chocolatey package manager and use this command:
$ choco install terraform
Once you have Terraform installed, you may validate the installation by using this command:
$ terraform --version

Terraform v0.11.11

Your version of Terraform is out of date! The latest version
is 0.12.26. You can update by downloading from www.terraform.io/downloads.html
3. Writing Terraform Code
To start with a Terraform project, create a new directory for this project that will contain all the Terraform code that we will be writing shortly. In this example, we will create a directory called hello-terraform-aws-ec2 and change working directory to it.
In this directory, create a new file called providers.tf and type the following code into it:
provider "aws" {
  region = "ap-southeast-1"
}
The code above specifies that Terraform will be provisioning resources on AWS (provider), specifically on ap-southeast-1 region.
Next, we will create file called main.tf. As the name implies, this is our main file that will contain most of our implementation code. In this instance, write the following code into this file:
resource "aws_instance" "myweb" {
  ami           = "ami-0e763a959ec839f5e"
  instance_type = "t2.micro"

  tags = {
    Name = "AkuDev"
  }
}
The code above specifies a set of instructions to Terraform to create a new EC2 instance aws_instance, using the Ubuntu 18.04 LTS machine image ami-0e763a959ec839f5e with the instance type of t2.micro. Finally, we are asking Terraform to name this new instance as AkuDev
You may find the complete list of ami-id provided by Ubuntu on Amazon EC2 AMI Locator. You can see on the illustration below:
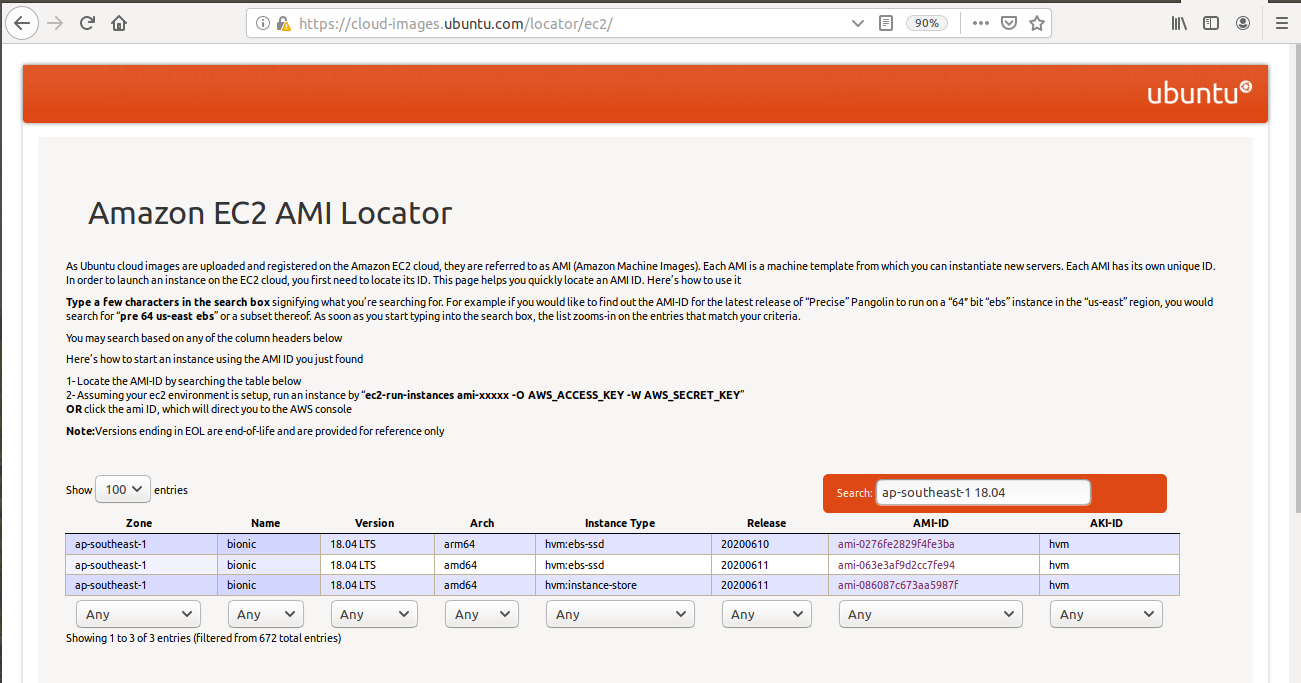
Some versions might not be displayed due to the release cycle from Ubuntu itself. Another way to locate your preferred ami-id is by using AWS CLI. You may learn further on how to locate ami-id from Finding a Linux AMI
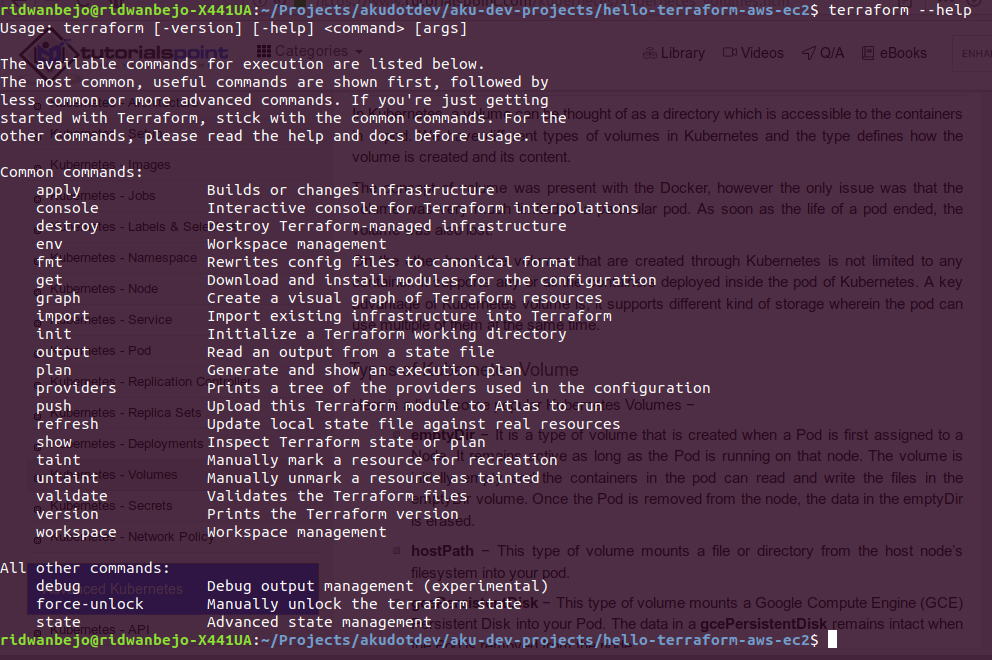
To explore the full list of Terraform commands and what does each of them do, you may simply type terraform help on your terminal:
4. Running Terraform Code
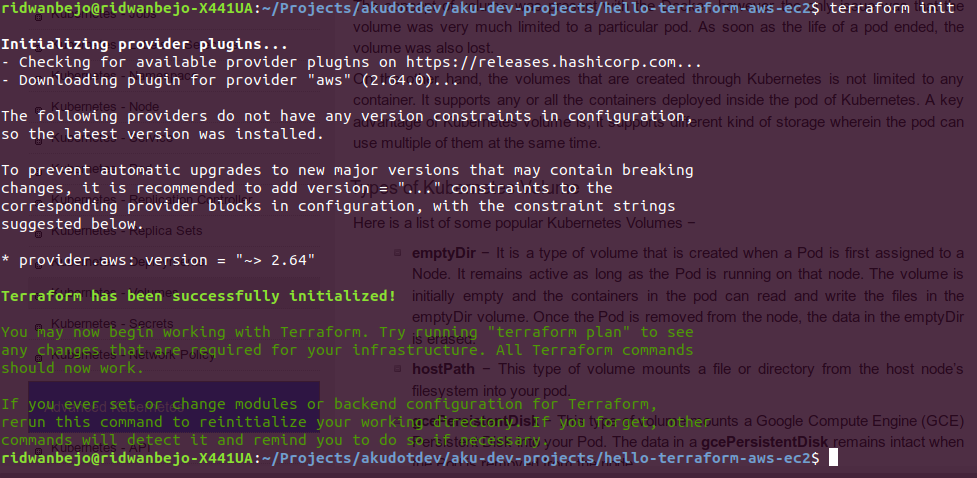
Under the project directory, we have to initialize our Terraform task by using the following command:
$ terraform init
The command above will perform necessary tasks such as downloading Terraform Plugin that your code will need to work with some cloud providers such as AWS.
After the initialization step is completed, we have to plan our Terraform tasks by using the following command:
$ terraform plan
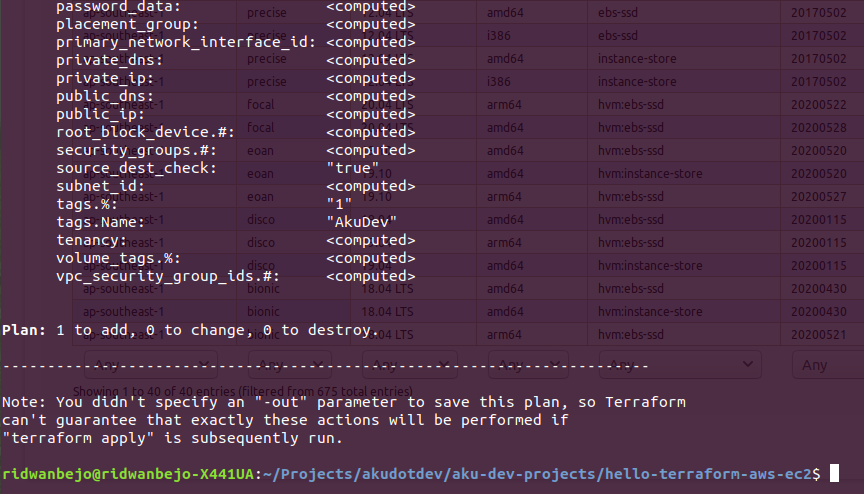
By planning Terraform tasks, you are able to verify the actions that will be performed by Terraform before the actual change is executed. For example, you will see the details of your EC2 instance even before the instance is created by Terraform on your infrastructure.
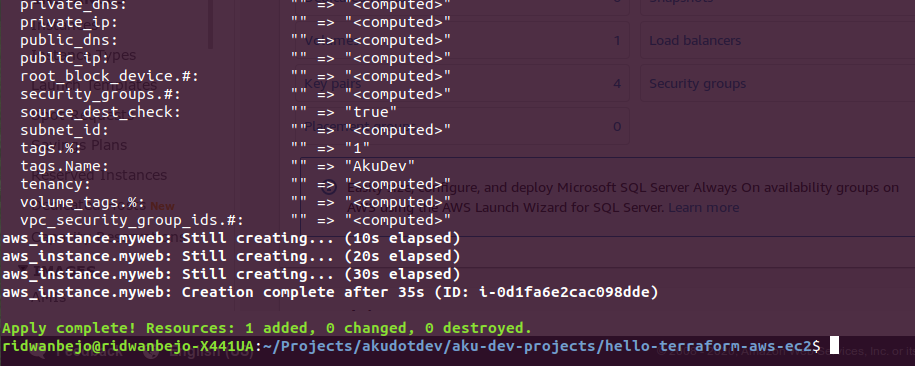
Once you have verified the changes about to take place, you may apply the task by using the following command:
$ terraform apply
The apply command will execute the actual task, therefore it may take some time because it will need to communicate with AWS in order to provision the EC2 instance via HTTP connection.
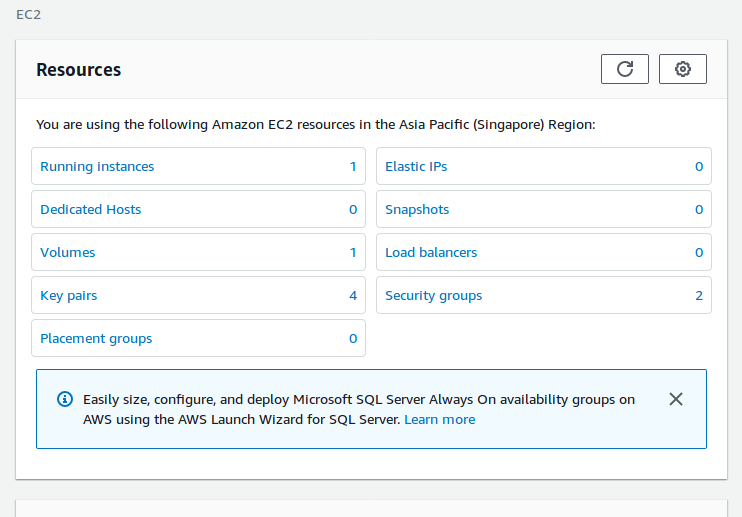
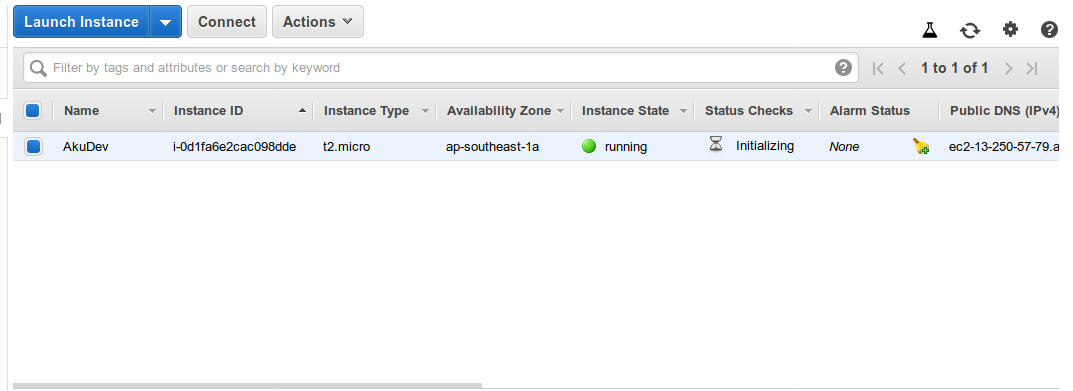
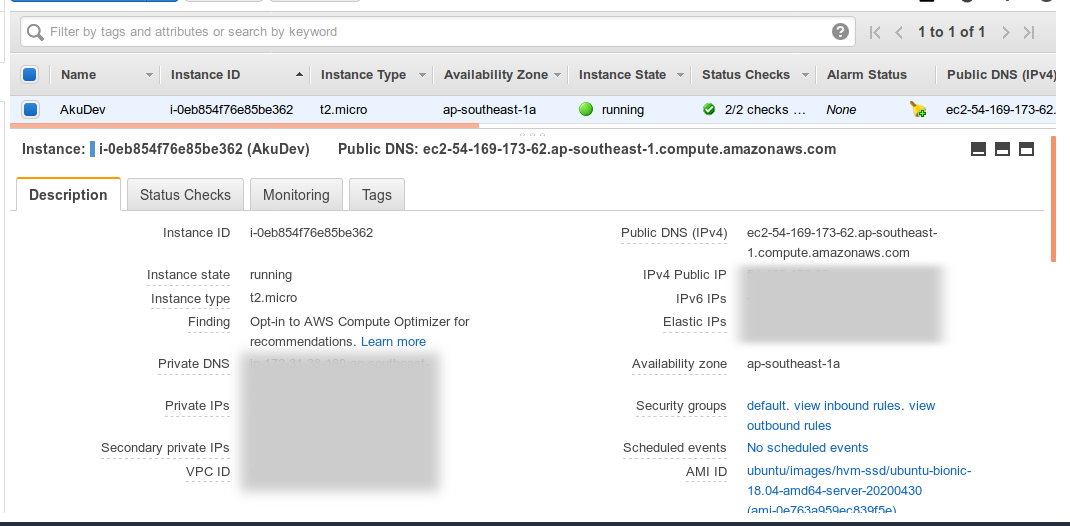
5. Check the Result
Once Terraform tasks have been applied, you may verify if the EC2 instance is created correctly by logging on to AWS Console.
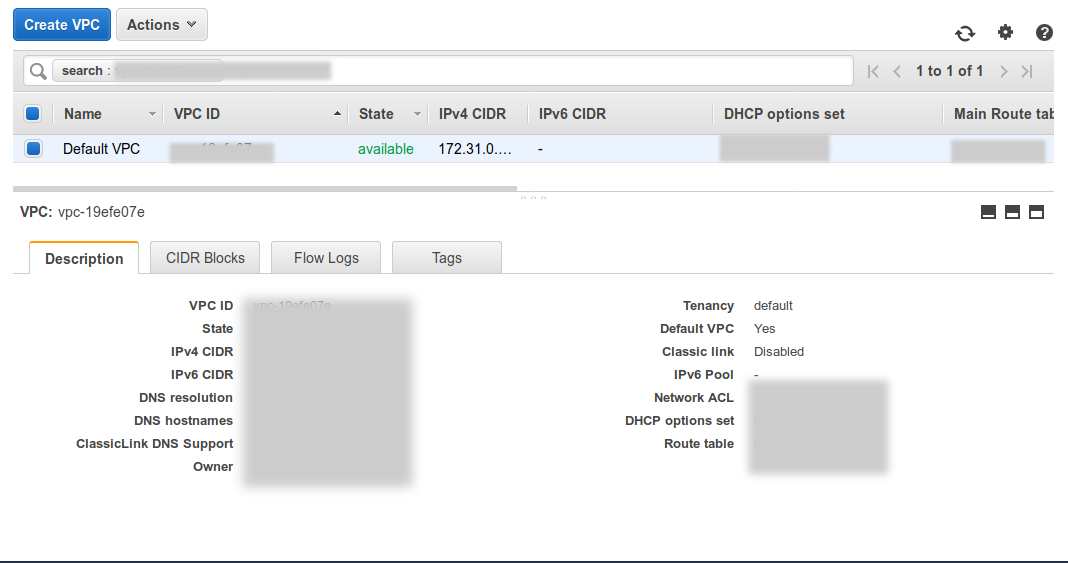
By default, if we don’t specify VPC for our EC2 instance, Terraform will provision your instance on the Default VPC. You may see that on this illustration:
You may further verify that in VPC console and check the vpc-id with id of Default VPC there:
To destroy the EC2 instance that you have just created, you can simply issue the following destroy command:
$ terraform destroy
6. Other Terraform Powerful Features
In this section, we will explore other powerful features from Terraform that we can apply in our use case.
A. Create multiple EC2 instances with count parameter
By using count keyword, we can create multiple EC2 instance of the same type. By adding count on our previous example, the script will create 3 instances of the same type:
resource "aws_instance" "myweb" {
  ami           = "ami-0e763a959ec839f5e"
  instance_type = "t2.micro"
  count = 3

  tags = {
    Name = "AkuDev"
  }
}
This feature is particularly useful when creating identical instances such as Kubernetes nodes, MariaDB nodes, PostgreSQL nodes, etc.
As before, let’s plan the execution:
$ terraform plan

Refreshing Terraform state in-memory prior to plan...
The refreshed state will be used to calculate this plan, but will not be
persisted to local or remote state storage.

aws_instance.myweb[0]: Refreshing state... (ID: i-0eb854f76e85be362)

------------------------------------------------------------------------

An execution plan has been generated and is shown below.
Resource actions are indicated with the following symbols:
  + create

Terraform will perform the following actions:

....

      tags.%:                       "1"
      tags.Name:                    "AkuDev"
      tenancy:                      <computed>
      volume_tags.%:                <computed>
      vpc_security_group_ids.#:     <computed>


Plan: 2 to add, 0 to change, 0 to destroy.

------------------------------------------------------------------------
As you can see from the output above, since we already have one instance created earlier, Terraform will only provision another two instances from that script. Now let’s apply the script:
$ terraform apply
....
tags.Name: "AkuDev"
tenancy: <computed>
volume_tags.%: <computed>
vpc_security_group_ids.#: <computed>
Plan: 2 to add, 0 to change, 0 to destroy.
Do you want to perform these actions?
Terraform will perform the actions described above.
Only 'yes' will be accepted to approve.
Enter a value: yes
....
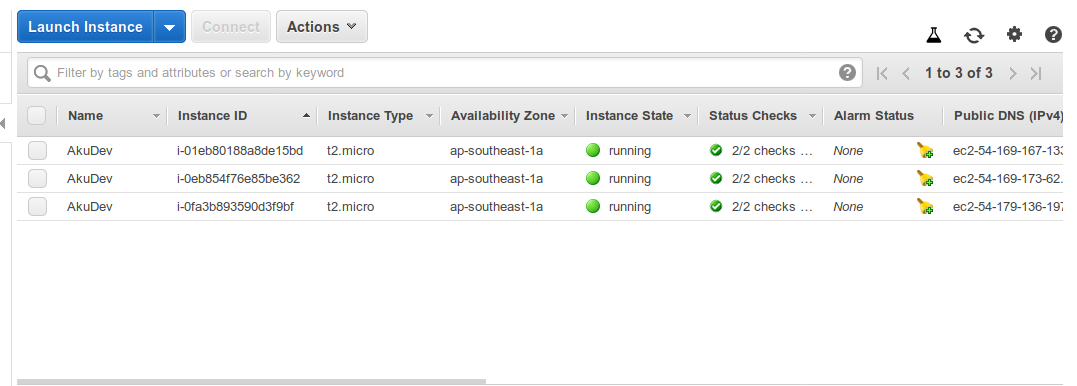
aws_instance.myweb[1]: Creation complete after 25s (ID: i-01eb80188a8de15bd)
aws_instance.myweb[2]: Creation complete after 25s (ID: i-0fa3b893590d3f9bf)
Apply complete! Resources: 2 added, 0 changed, 0 destroyed.
From the output above, we could see that another two instances are created under a minute as soon as we applied the script. You may verify this on your EC2 Dashboard. Pretty easy!
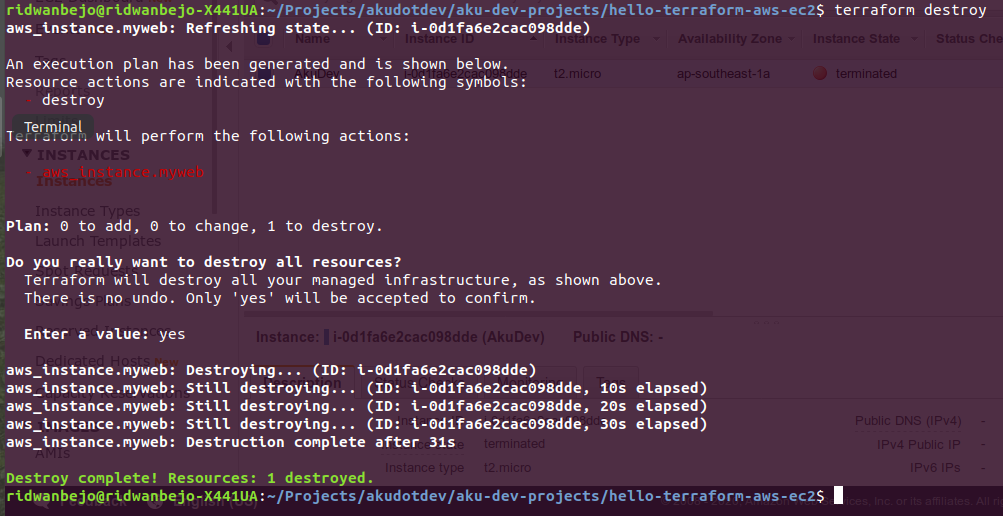
If you don’t need these instances anymore, you may delete those instances by using terraform destroy:
$ terraform destroy

An execution plan has been generated and is shown below.
Resource actions are indicated with the following symbols:
  - destroy

Terraform will perform the following actions:

  - aws_instance.myweb[0]

  - aws_instance.myweb[1]

  - aws_instance.myweb[2]


Plan: 0 to add, 0 to change, 3 to destroy.

Do you really want to destroy all resources?
  Terraform will destroy all your managed infrastructure, as shown above.
  There is no undo. Only 'yes' will be accepted to confirm.

  Enter a value: yes

....

aws_instance.myweb[1]: Destruction complete after 32s
aws_instance.myweb[2]: Destruction complete after 32s
aws_instance.myweb[0]: Destruction complete after 32s

Destroy complete! Resources: 3 destroyed.
We are done with provisioning multiple instances, now let’s try another trick in the next section.
B. Accessing the instance via SSH
In order to access the instance remotely, we typically use SSH to access it. So how do we achieve that using Terraform?
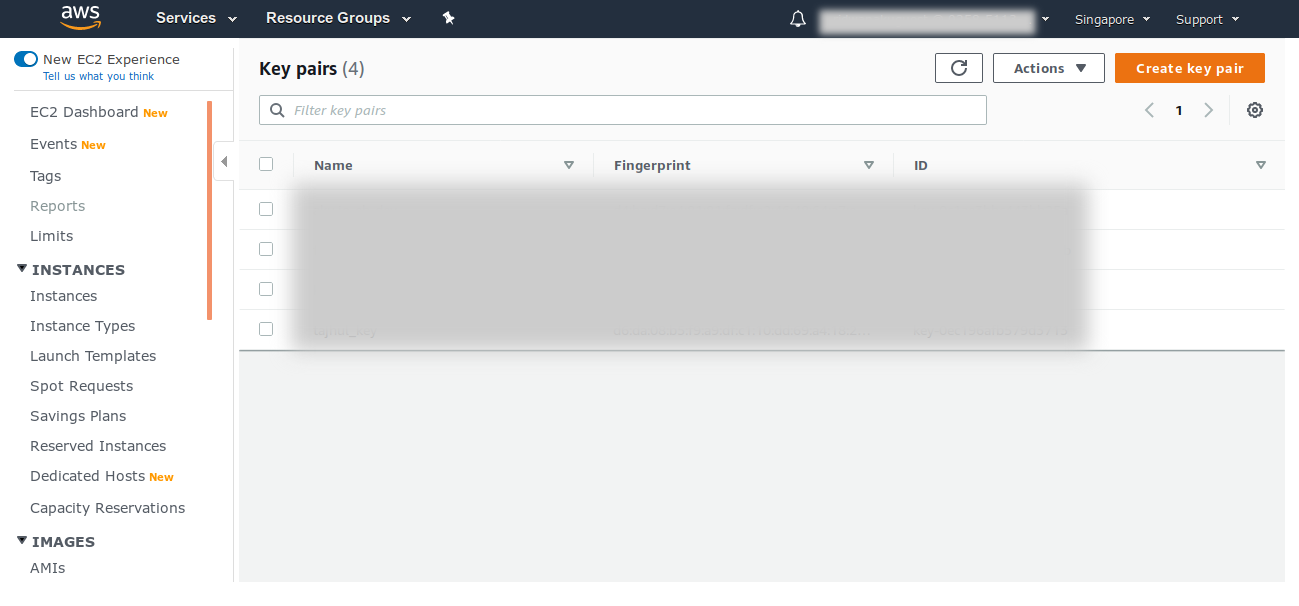
First, you need to create key-pairs to let the instance recognize you as an authorized user. First, go to EC2 dashboard. Then, find Key Pairs menu on the left sidebar.
Create a pem file to use it over OpenSSH if your workstation is running OpenSSH instead of PuTTY.
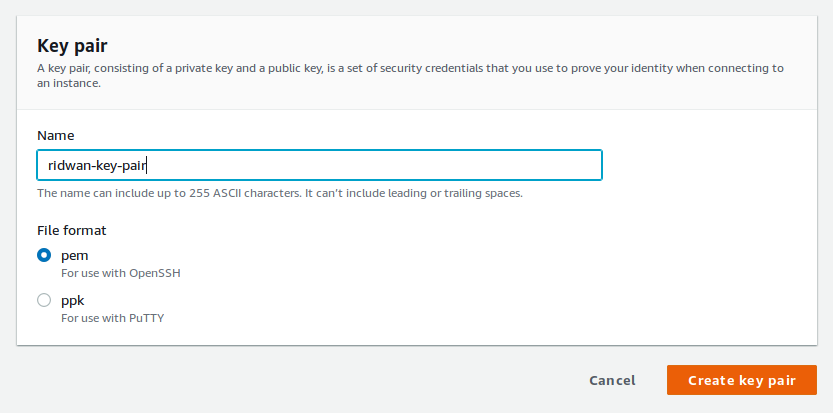
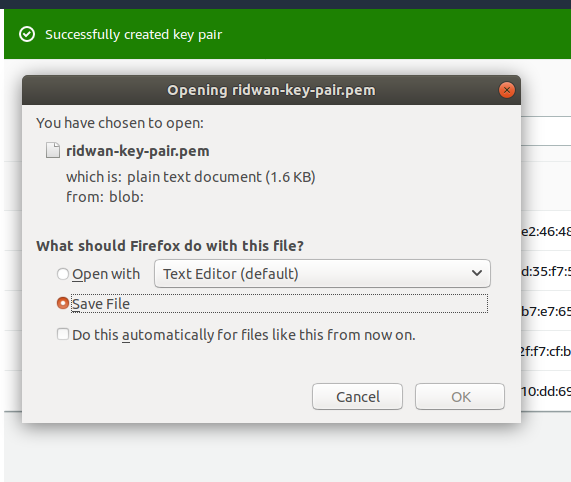
Your key pairs are ready, you can download it to your workstation.
Once you have your key pairs, you have to attach it to your Terraform script within your instance resource. Under aws_instance resource, you could specify key_name to attach your key pair into your EC2 instance. As a best practice, you should limit CIDR blocks to your allowed IP addresses only, for example limiting the access to the machine only from your workstation or IP addresses from your office.
Here is the example of main.tf that contains the configuration to allow the EC2 instance to be accessed over SSH:
resource "aws_security_group" "allow_ssh" {
  name        = "allow_ssh"
  description = "Allow ssh inbound traffic"
  vpc_id = "vpc-19efe07e"

  ingress {
    from_port   = 22
    to_port     = 22
    protocol    = "tcp"
    cidr_blocks = ["203.210.84.220/32"]
  }
}

resource "aws_instance" "myweb" {
  ami           = "ami-0e763a959ec839f5e"
  instance_type = "t2.micro"

  tags = {
    Name = "AkuDev"
  }

  key_name = "ridwan-key-pair"
  security_groups = [ "${aws_security_group.allow_ssh.name}" ]
}
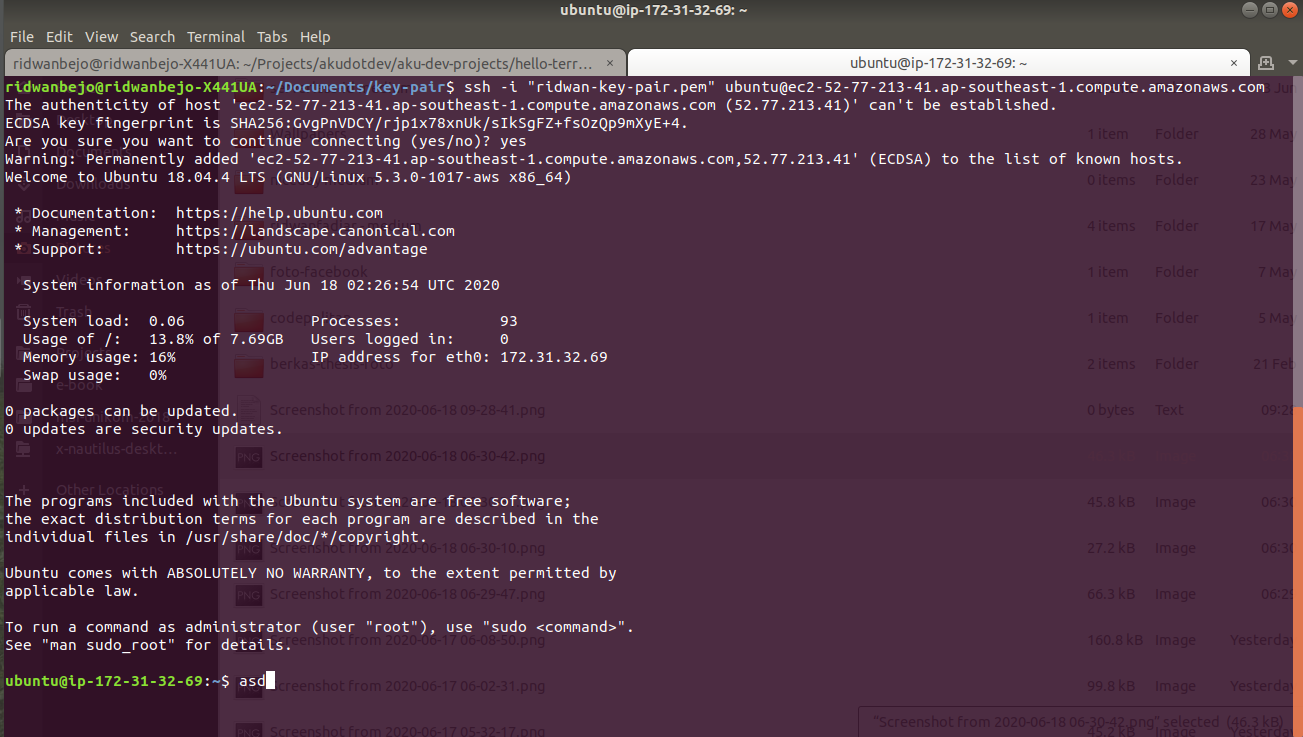
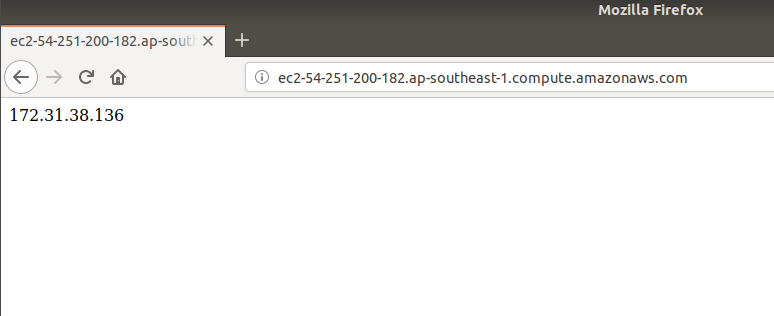
Now, lets validate it with terraform plan. If you don’t find any errors, you may provision your new instance with SSH access by using terraform apply. Once the apply command is successfully executed, you should be able to access the instance by using this command on your workstation:
$ chmod 400 ridwan-key-pair.pem
$ ssh -i "ridwan-key-pair.pem" ubuntu@ec2-52-77-218-41.ap-southeast-1.compute.amazonaws.com
You might see the result as an illustration below:
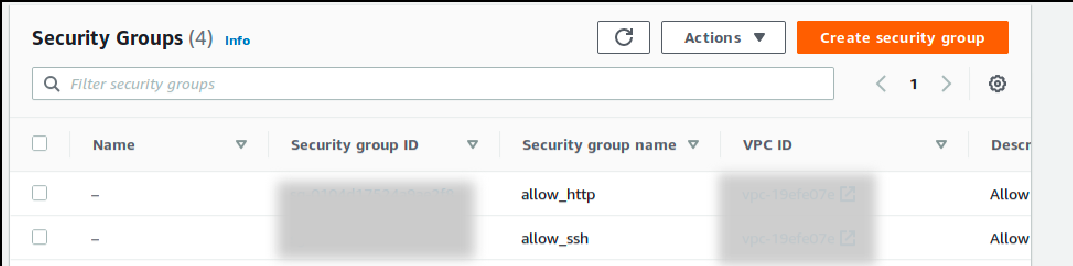
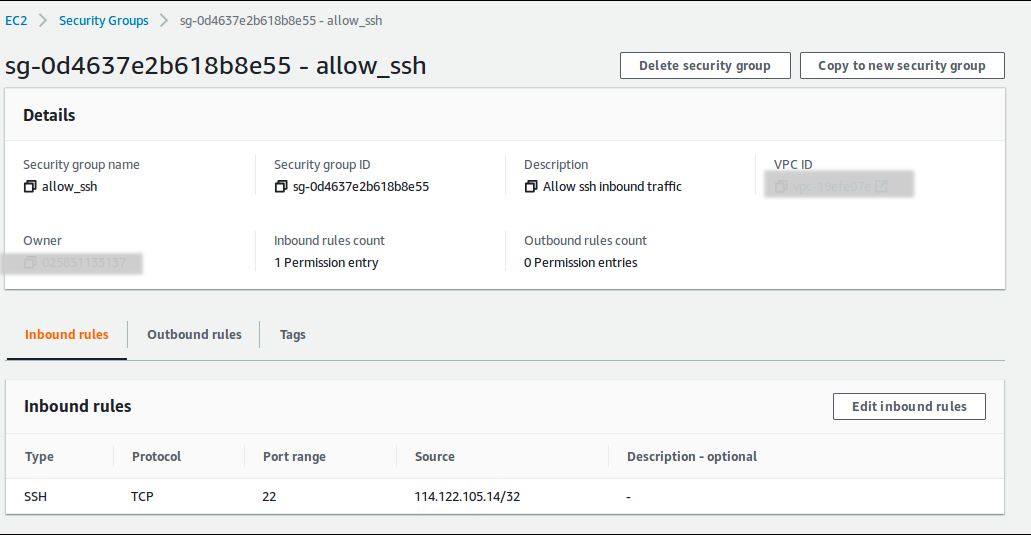
If you want to inspect further, you could check your security group at Security Groups menu on EC2 dashboard. You should see the detail of your allow_ssh security group over there.

C. Add initial deployment with user_data
You can also leverage the interesting EC2 User Data feature using Terraform. You could pass any script that you want to run as an initial deployment on your EC2 instance and with Terraform, you can do that too. All you need is just a single BASH script that contain commands to run any softwares. For example you want to install web server or some monitoring tools inside your EC2 instance at launch.
For example, here is init-script.sh that will install Nginx in your EC2 instance during the first time deployment:
#!/bin/bash
sudo apt-get update -y
sudo apt-get install nginx git zip curl wget php php-fpm -y

sudo mkdir /var/www/php

cat <<EOF | sudo tee /var/www/php/index.php
<?php
print_r(\$_SERVER['SERVER_ADDR']);
EOF
sudo chown -R www-data:www-data /var/www/php
sudo rm -rf /etc/nginx/sites-available/example.com
cat <<EOF | sudo tee /etc/nginx/sites-available/example.com
server {
    listen 80;
    root /var/www/php;
    index index.php index.html index.htm index.nginx-debian.html;
    location / {
        try_files \$uri \$uri/ /index.php?\$query_string;
    }
    location ~ \.php$ {
        fastcgi_pass unix:/var/run/php/php7.2-fpm.sock;
        fastcgi_index index.php;
        fastcgi_param SCRIPT_FILENAME \$realpath_root\$fastcgi_script_name;
        include fastcgi_params;
    }
    location ~ /\.ht {
        deny all;
    }
}
EOF

sudo ln -s /etc/nginx/sites-available/example.com /etc/nginx/sites-enabled/
sudo unlink /etc/nginx/sites-enabled/default
sudo nginx -t
sudo systemctl stop apache2
sudo systemctl restart nginx
Since we will be running a web server on our instance for the first time, we have to add Security Group to allow incoming requests to our web server through port 80 and allow all outgoing requests. After you add the new security group, you have to load init-script.sh with keyword user_data in your resource definition under aws_instance resource. Terraform will run init-script.sh once the instance ready.
Here is the main.tf that implements EC2 user data which configures access and deploys Nginx web server in the newly created EC2 instance:
resource "aws_security_group" "allow_http" {
  name        = "allow_http"
  description = "Allow http inbound traffic"
  vpc_id = "vpc-19efe07e"

  ingress {
    from_port   = 80
    to_port     = 80
    protocol    = "tcp"
    cidr_blocks = ["0.0.0.0/0"]
  }

  egress {
    from_port       = 0
    to_port         = 0
    protocol        = "-1"
    cidr_blocks     = ["0.0.0.0/0"]
  }
}

resource "aws_security_group" "allow_ssh" {
  name        = "allow_ssh"
  description = "Allow ssh inbound traffic"
  vpc_id = "vpc-19efe07e"

  ingress {
    from_port   = 22
    to_port     = 22
    protocol    = "tcp"
    cidr_blocks = ["203.210.84.220/32"]
  }
}

resource "aws_instance" "myweb" {
  ami           = "ami-0e763a959ec839f5e"
  instance_type = "t2.micro"

  tags = {
    Name = "AkuDev"
  }

  user_data = "${file("init-script.sh")}"
  key_name = "ridwan-key-pair"
  security_groups = [ "${aws_security_group.allow_http.name}", "${aws_security_group.allow_ssh.name}" ]
}
Now, lets validate it with terraform plan. If you don’t find any errors, let’s run terraform apply command. Once you have successfully executed the new script, you may access the instance by using the following command on your workstation and see the initial deployment result.

You should also able to access your web server with the public DNS on your web browser.
7. Conclusion
Terraform provides capabilities to provision EC2 instance and supports various use cases. You could provision your EC2 instance by adding specific security group, add initial deployment with BASH script or create multiple instances with the same specifications. With Terraform, you could retain your EC2 instance artifact and recreate it in the future and destroy it easily if the instance is no longer needed.
Editor: Elaia Raj, Fajri Abdillah